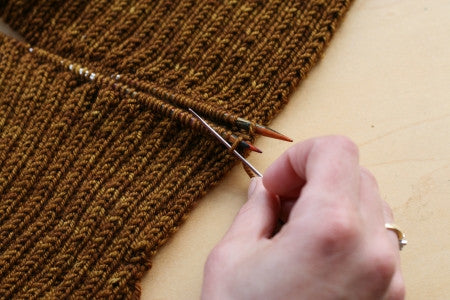
This 2x2 ribbing is shown specifically for back of cardigan Pecan Crush but you can use it for any project that requires grafting. It begins with a p1 and ends with k1. If you are grafting 2x2 ribbing that begins with k1 then work steps 4 and 6 and then move on to 2x2 ribbing.
DIRECTIONS
Thread a tapestry needle with the yarn. Hold both needles parallel to each other. It can be helpful to lay them on a table in the position they need to be worked in. When I'm working grafting once I get into the rhythm I just find myself chanting the method, I've put this short hand in brackets underneath each section!).
For the Pecan Crush pattern the first stitch is a purl stitch.
Set-Up Purl Stitch (2 set up sts, knit, purl, then, Front: Purl, purl; Back: Knit, Knit).

1. Pull needle through first front st as if to knit.

2. Pull needle through first back st as if to purl.

3. Pull needle through first front st as if to purl and slip st off needle.

4. Pull needle through next front st as if to purl, but leave st on needle.

5. Pull needle through first back st as if to knit and slip st off needle.

6. Pull needle through next back st as if to knit, but leave st on needle.
2x2 Ribbing
First Knit Stitch (Front: Knit, Purl; Back: Purl, Knit).

1. Pull needle through first front st (knit st) as if to knit and slip st off needle.

2. Pull needle through next front st as if to purl, but leave st on needle.

3. Pull needle through first back st (knit st) as if to purl and slip st off needle.

4. Pull needle through next back st as if to knit, but leave st on needle.
Second Knit Stitch (Front: Knit, Knit; Back: Purl, Purl).

5. Pull needle through first front st (knit st) as if to knit and slip st off needle.

6. Pull needle through next front st (purl st) as if to knit, but leave st on needle.

7. Pull needle through first back st (knit st) as if to purl and slip st off needle.

8. Pull needle through next back st (purl st) as if to purl, but leave st on needle.
First Purl Stitch (Front: Purl, Knit; Back: Knit, Purl).

9. Pull needle through first front st (purl st) as if to purl and slip st off needle.

10. Pull needle through next front st (purl st) as if to knit, but leave st on needle.

11. Pull needle through first back st (purl st) as if to knit and slip st off needle st on needle.

12. Pull needle through next back st (purl st) as if to purl, but leave st on needle.
Second Purl Stitch (Front: Purl, Purl; Back: Knit, Knit).

13. Pull needle through first front st (purl st) as if to purl and slip st off needle.

14. Pull needle through next front (knit st) st as if to purl, but leave st on needle.

15. Pull needle through first back st (purl st) as if to knit and slip st off needle.

16. Pull needle through next back st (knit st) as if to knit, but leave st on needle.
Repeat steps 1 to 16 until you have reached the last stitch, work steps 1 to 4 once. Take care to pull yarn carefully through worked stitches periodically. Make sure you do not work it too tight; it should look like a knitted stitch. If the stitch gauge is loose you will need to keep the grafting loose to match the work. You will see that there is a half stitch jog that is normally not noticeable when working grafting (as it is only visible when you change stitch type). If you work the grafting with a good stitch tension it will allow the graft to draw in together and looks like the remaining ribbing and the offset cannot really be seen.Why not try this technique here:
Why not try this technique in the following patterns:
READY TO LEARN MORE? CHOOSE WHERE TO GO NEXT:


